The pix-link wifi repeater is an incredible extender. Its main work is to boost your wifi signal range up to multiple devices. You can access up to 300Mbps Speed on your devices. It supports only a single bandwidth connection, only 2.4Ghz.
The PIX-LINK WiFi Range Extender is also known as the best Pix link wifi Repeater, superior Pix-link Access Point, great signal Pix-link Wireless Signal Booster, etc. It covers or expands the wifi signal range up to the 800 Square feet maximum location.
Moreover, the pix link wifi extender is compatible with any wi-fi router, modem, gateway, or access point. The Pix-link wifi extender signal booster provides 360° strong penetration. It can easily penetrate your home wifi signal in all directions including the dead zone. So, you can use its better wifi connection at any time, appropriate for families, mainly for bedrooms, floors, restaurants, laptops, Smartphones, gardens, telephones, Smart TV, etc.
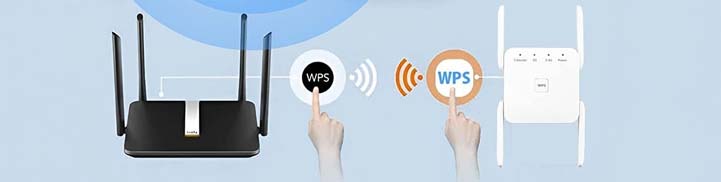
The pix link wifi extender setup is based on the web, it does not require an app. Just connect the pix-link repeater to the wifi router via the web page. In case you have a WPS-compatible wireless router, you can efficiently boost the wireless range by pushing the WPS button. The pix-link wifi repeater/router/ap overall performance is too good.
pix-link wifi repeater installation
Before connecting the pix-link wifi extender signal booster network kindly install it. You will follow the pix-link wifi repeater instructions and steps given below to installing it.
- In the beginning, you will take it out from its packaging box.
- Also, takes all the supplements to the Pix link repeater setup from its packaging box.
- Kindly take from its supplement a pix-link extender manual.
- Read all the instructions for the pix-link wifi repeater setup from its user manual guide.
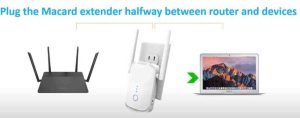
- Afterwards, place it near your wifi router.
- Plug it into the power adapter directly and then connect your pix-link wifi repeater with the wifi router.
- It helps you to boost the network signal range into your home each corner including the dead zone.
- Just you will place it near the better signal coverage location, otherwise it causes an error.
How to connect pix-link wifi repeater?
After completing the pix-link wifi extender wireless booster installation, you will connect the pix-link wifi extender with the wifi router. These are the steps to connect the pix-link wifi repeater.
- Repeater mode: Hook up your wireless devices to the Pix-link wifi repeater through an Ethernet cable and wirelessly, then enjoy the internet connection.
- Plug the Pix-link Wi-Fi Repeater into a main power outlet just next to your wireless router.
- Make sure the Pix-link wifi extender LED signal light is turned on that shows normal power supply.
- Now, you have to use a wired/wireless mode to connect it with the internet of your wifi router.
- If you use a WPS connection mode, then simply hold and press the Pix-link wifi extender WPS button more than 5s until the pix link repeater led blink rapidly.
- Otherwise, you can use the LAN/WAN connection mode to connect Pc or router with your pix-link extender.
- After connecting the pix-link wifi extender with the internet the pix-link wifi repeater wifi LED signal light will automatically up and it’s been ready for transmitting the data.
Troubleshooting:– If the Pix-link wi-fi extender LED blinking slow, that means it shows about the Pix-link extender WPS failure or relay failure. Then, it will not transmit or receive data. To get rid of the issue, you just connect it again with the internet and use its network again. Finally, the tp-link system is operating normally.
Pix-link WiFi Extender Login
If you want to make any changes in your device first you will have to access the pix link login page. If you want to know. “How to login the pix-link extender?” Here are the steps which will help you to access the Pix-link wifi extender signal booster.
- First, connect the pix-link extender wifi to your computer or smartphone.
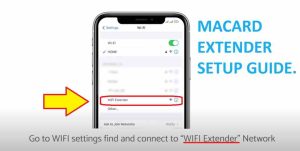
- To connect a wifi, go into your phone’s settings, and choose the network or wifi settings.
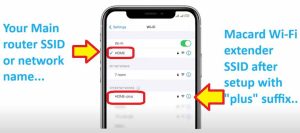
- Then, locate under the wifi settings the Pix-link extender SSID: Pix-link-2.4Ghz and enter the pix-link wifi extender default password. Click on the connect option and ensure that your mobile is connected with wifi. If the pix-link wifi extender not connecting, you just try to connect it again with a correct password. If this issue persists, you just simply reset your all devices. Also, unplug the Ethernet cable.
- Launch the web browser and enter the web address, setup.pix-link or pix-link extender default ip, it is 192.168.7.234.
- Search the Pix link extender web address and access the web default pix-link repeater.
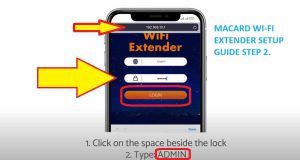
- The Pix-link extender login admin page is launched on screen.
- Type the pix-link wifi extender password and username.
- Make sure the pix-link extender login credentials are correct. Now, the pix-link wifi extender login process is finished. After login, go to the setup page.
pix link wifi extender setup
After completing the pix link wifi range extender login, you need to modify some settings into your range extender. Here are some following checkpoints for its setup.
- Once you login it, go on the pix-link wifi repeater setup page.
- Explore setup.pix-link io the web browser.
- It will directly move you on the pix link setup page.
- After this, set the various settings of the pix link wireless range extender.
- Then, choose the pix-link setup option.
- After this, to manage and control the settings you will have to emulate the on-screen instructions which are mentioned on the desktop web screen.
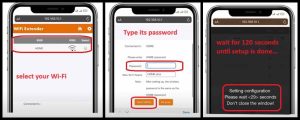
- If you want to do the pix-link-2.4g setup, just choose the network bandwidth settings and let’s apply the network settings for getting the 2.4ghz band network.
- It gives a better network after modifying the settings like resetting the pix-link extender password because the pix link wifi extender password is the same as your master router.
- Moreover, you can also make some other changes through the Pix link wifi extender setup page as following the given instructions on the screen.
- Save all the settings in the end, which you all have modified into your device. Finally, in this way, your pix-link wifi extender configuration has been completed successfully.
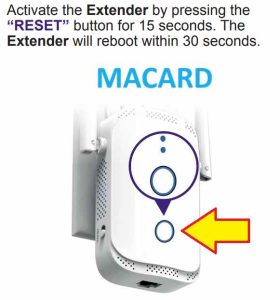
reset pix-link wifi extender
There are the following steps to reset pix-link wifi extender factory default settings.
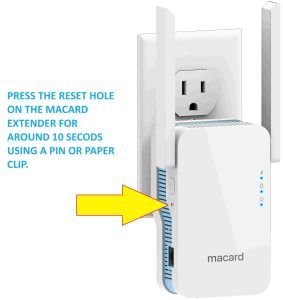
- The pix-link wifi range extender reset process can be easily done with its reset button,
- It is given on the pix link extender back panel.
- You will locate the Pix-link extender reset button.
- After locating it, press and hold the pix-link extender button more than 5s until the pix-link wifi repeater led quick blinking, through this the pix-link system set factory default settings.
- Now, you have to reset the pix-link wifi extender.
- After this, turn on it and use its network for accessing the better connection of the network. Make sure the pix-link extender LED signal light will turn on.
pix-link wifi extender not working
When the pix-link wifi extender not working, you just restart the pix-link wifi extender. After this, go on the web page and configure the pix-link extender wifi settings accordingly. It will provide you with a great network signal as compared to others.
What to do if not connect?
If the Pix-link wifi range extender does not connect with your router, you just ensure that it is compatible with your wireless router or not. If it is not compatible, then use another device and connect it again.
Usually, sometimes, the Pix-link extender does not connect due to an unstable network connection of your wifi router, so, you must verify the signal status of your device and if it does not provide a stable network signal range, you just found out a feasible solution for it.
In this case, you will restart your device and reconfigure it. Surely, through this way you can overcome or easily troubleshoot the Pix-link wifi extender not connecting issue.
pix-link wifi extender review
The Pix-link wifi extender works as a smart system because it boosts your wifi home router signal range in the overall zone into your home and office. It brings the various amazing and superior features that makes its working great. So, if you want to get a better experience device to boost your network, you can use it. The pix link app is too helpful to control and manage its settings anywhere. Whether it’s all setup can be only based on the web browser, but if you want to control its network from outside from the home then you should use the pix link app. The pix-link wifi extender review is great, you can check it from Amazon and another device selling this platform.
Also Read:
wireless-n wifi repeater login