Search for:
Generic wifi extender setup

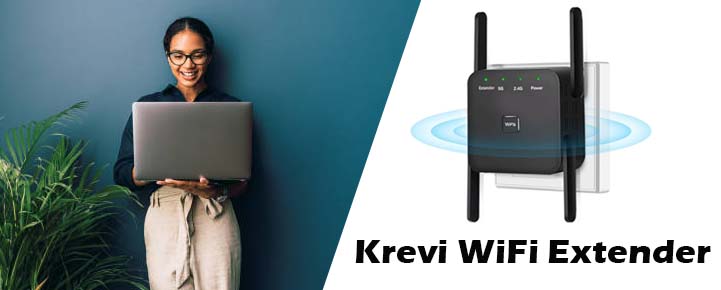
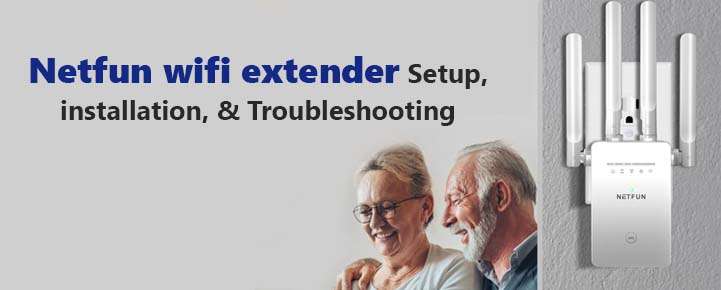
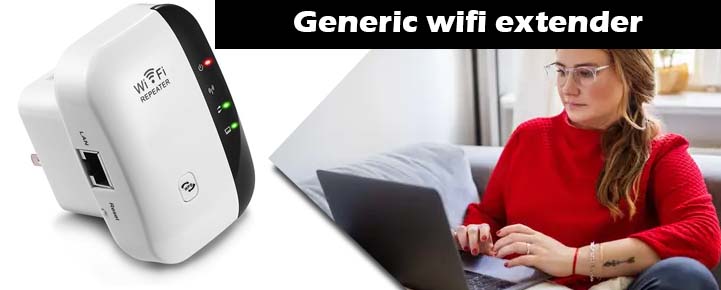
How to Setup 2024 Newest Generic Wifi Extender/Repeater?

Wifi Extender are called by different names like wifi repeater, internet booster etc. So, in this article we will learn about how to setup newest wifi extender of 2023 by brand generic. Once configured you will be able to connect laptop, computer, smart tv, air conditioner, vacuum cleaner, alexa, etc.

The setup of this extender is really simple. First method is via wps and second is via browser setup. In this article today we will guide you with both the processes. First and foremost make sure you have working router in your house/office. Also your wifi router should be broadcasting the wifi, that means its wifi should be ‘on’.

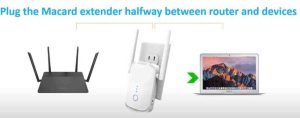
Next, kindly note both the generic wifi booster and your router should be plugged in the same room. Although after setup you can unplug the extender and place it at your desired location. Now, lets start the process-

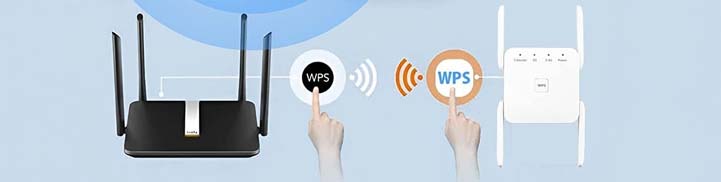
Generic wifi extender setup via wps

  • Make sure you should be having a solid green power led on the extender. If in case it is blinking then kindly wait for 60 seconds and let it get stable.
  • Now, press a wps button on your router for around 2 seconds. Now in case you don’t know how the wps button looks like, then you can check here.
  • Within 2 mins you need to press the wps button on your extender. The wps button on the extender can be found at the very front of it. You need to just press and hold it for 2 seconds. This will initiate a wps connection between your router and the extender.
  • A solid wifi led on the extender confirms a successful wps connection. You can now unplug this generic repeater and then place it at the location where you need wifi/Internet.
  • We recommend you to place is extender away from bigger home appliances like microwave, refrigerators, ac’s, etc. Also it will be better if you place it in direct line of sight of the router.
  • In case the wps setup isn’t working for you then it is likely possible that the wps is disabled on the router. You can quicklt enable it in just two easy steps. Watch the quick guide here on how to enable wps on the router. Now, you can reset the generic extender and then try the setup again.

Additionally, lets learn how to setup it up via phone/laptop or browser method.

Generic Wireless Signal Booster Setup Via Phone or Laptop

  • For this setup you need to grab any of your phone or computer. Moreover the wifi extender should be plugged in to the wall and power led on it should be stable.
  • It will be better if both the extender and router are in the same room while you are doing the setup.
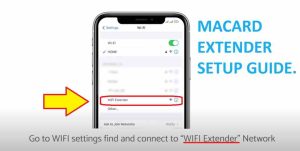
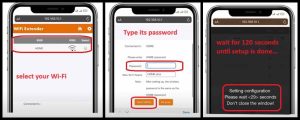
  • So first and foremost goto the wifi list on your phone or computer. There you will see your generic wifi extender default network name showing up. It will come up as “Wifi-XXX” or “Wifi-XXX-5G”. Connect to one of it. If your router doesn’t support the 5G then do not connect with the 5G Network.
  • Once you connect to that network name, the setup window will pop-up automatically. If it doesn’t then open a browser on the very same phone/laptop. Next, into the url of the browser type this ip address to access generic extender login page.
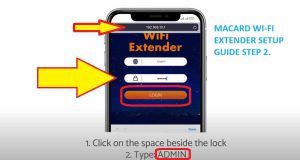
  • There you need to type 192.168.188.1 and hit enter.
  • On the generic repeater setup page type password as “admin” and hit next. If that doesn’t work then there might be a password written on the back label of the extender. Try that instead.
  • Later it will scan for all the available networks and then will show you the list of network names. So, there you need to select your router’s wifi network name.
  • Once you do that it will ask you to confirm your router’s password too. Here, you need to type the password as it is because it is case sensitive. Hit save settings, next.
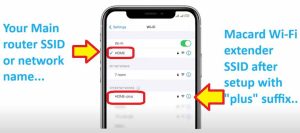
  • Your extender will take around 60 seconds and will reboot in between. After successful setup it will show you your extender network name its password. You can note it down for future use or maybe simply just click a picture of that information. Mostly the extender’s default network name after setup is just an added “Pro” suffix in the end of your wifi network name. Also the password remains same as your router’s wifi password, until you have customised it during the setup.

How to Reset Generic wifi extender or Internet Booster?

Now, in case none of the above setup methods work. Then it is very likely possible that the extender is having some pre-saved settings. We can remove those by resetting it once. And it is very simple to reset any wifi range extender or wifi repeater.

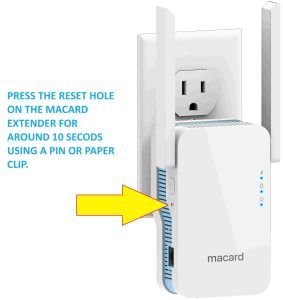
In order to reset generic extender you first need to plug it in into a wall outlet. Now, wait until its power led gets stable for atleast 60 seconds. Next, grab a paper clip, pencil or anything pointed like pin.

Put it inside the reset hole of the extender, which is found at the bottom of the extender. You need to hold the pin there for around 10 seconds while the extender is still plugged in to the wall. After 10 seconds take the pin out. And let the extender reboot.

You can now try the setup again via wps or browser method as mentioned above.

How to Connect smart tv, alexa, gaming console to the generic extender?

After successfully setting up the extender you might be wondering how to connect my devices to it now. So, basically all you simply need to do is goto the wifi list on any device and select your wifi repeater among the list, type its password and voila!

Like if we talk about smart tv then you will need to goto the settings on your smart tv, then goto network and then to wireless network. Scan for available networks next. There you will see your extender’s network name showing up. Select that one type its password and now you are using extender’s wifi on your smart tv. It is beneficial when our smart tv is far away from the router. Then you can plug the extender halfway between router and the smart tv to get good wifi speed.

Also you can connect ethernet cable from smart tv to the extender for even more faster speeds.

In the similar manner you can connect your alexa to the extender’s wifi. You can check the article here for better understanding.

macard wifi extender setup

How to Setup Macard Cryo360 Wifi Signal Booster Via Wps/Browser?

To setup Macard wifi extender we will need a working router with internet, a phone or computer, and a coffee. Now, most people nowadays are buying wifi extenders from amazon, etc but setting them up is getting difficult for them. So, here on our website we will help you with every information related to wifi extender, wifi boosters, wifi repeaters, etc.

Now, we can set this Cryo360 Macard Internet Booster up either via wps method or browser method. Now the easiest of the two is wps setup, so lets start with it. But before that plug the wifi repeater in the same room as the router. Now, wait for around 60 seconds until the power led on the wifi booster gets stable.

where to plug macard extender

Macard Wifi Extender Setup Via WPS

  • Look for a wps button on your wifi router. You need to press it once and it will initiate a wps connection. Now, in case you don’t know how the wps button looks like then you can watch the quick video here.
  • Next, within 2 mins press the wps button on the wifi extender once. As you do that you will see a blinking light on it. Also, most of the time the wps button on the extender is marked as “wps”. But in case if it doesn’t then press the only button on the extender, it is supposedly a wps.
  • It will take around 60 seconds for your router to make a connection with your macard extender. After successful wps setup the wifi light on your extender will turn solid. Moreover, if in case it doesn’t then try the wps setup again. It has been observed that sometimes the wps option is disabled on the router. So, you have to enable it to make successful wps connection between devices. You can check the video guide here on how to enable wps on the router.
  • You can now check newly setup extender’s network name showing up in your wifi list. So, grab phone or computer and go to its wifi list. There Macard extender network will come up as your “Home Network Name” and then with “Plus” Suffix in the end. For example if your router’s network is “JoseFamily” then extender network will come up as “JoseFamily-Plus”. Also, the password will be same as your routers wifi password.
  • You can now try connecting your phones, computers, laptops, smart tv, security camera to this extender’s network.

Now, in case this macard wifi extender setup method doesn’t work for you then try the second method. Also you can once try to reset the extender and try this setup again.

Macard Extender Setup via Browser “http://my.macard.online” or https://go.macard.online”

Now, all Macard extenders are provided with setup pdf manual along with their boxes. And it sometimes gets confusing if you can’t follow the manual properly and you try to look for answers online. The reason being different macard extender models are setup with online links. But the setup method remains the same for all. So, here in this article I will guide you step by step on how to successfully configure any macard wifi extender model number.

So, irrespective of which Macard wifi booster you have, kindly follow the steps as I say and definitely your device will set up. It is recommended that you reset the macard extender once. Also the power led on the internet booster should be stable. Moreover, it should be plugged in the same room as router.

  • First and foremost grab you phone or computer and goto its wifi list.
  • In your wifi list you will see your extender showing up with its default name. It comes up as “Wifi-Extender”, connect to it.

macard wifi extender setup

  • Next, open a browser on the very same device and on the very top of the browser in the address bar type “192.168.10.1” and hit enter. If this doesn’t work for you then try “http://my.macard.online” or https://go.macard.online” and hit enter. Now it will take you to the Macard extender setup page.

fastest wifi extender booster

  • So, on the Macard Wi-Fi login page type “admin” and click on “Login” to begin the setup.
  • IMPORTANT: Your wifi extender will scan for all the available networks in your area which takes around 15-30 seconds.
  • Now, among the list of all the available networks that it shows, kindly select your main router’s network name.
  • As you do that it will ask you to type its password for confirmation. The password is case sensitive so you just need to type your password as it is. Hit “Save Settings” next.

macard extender login

  • The extender will reboot within the next 60 seconds.
  • Next, goto your wifi list there you will see newly setup wifi extender network name showing up as your “Home Network Name” and “Plus” suffix. So, for example if your wifi network name is “JoseFamily” then your extender will show up in your wifi list as “JoseFamily-Plus”. You can tap on this network and type the same password as your router to connect to it.

wifi booster with plus suffix

  • Also, you can now unplug the extender and place it at your desired location. It should be placed halfway between your router and the location with poor wifi connectivity. Kinly note that wifi range extenders only extend your wifi range these are not meant to boost or increase your internet speed. So, if you have poor wifi speeds then kindly get in touch with your ISP. Also if you have bigger area to cover then instead of buying wifi range we recommend you to go for wifi mesh system.
  • Moreover, now you can connect your smart tv, roku, alexa, etc to the macard wifi extender.

So, this is how you can setup your macard cryo360 wifi booster via browser. Just in case none of the above mentioned steps work then we recommend you to reset the extender. Now, lets learn how to reset macard extender.

How to reset this Extender?

You will find the need to reset your extender when it is not broadcasting internet or when you are not able to setup macard wifi extender. It happens sometimes you extender will say no internet, or it keeps on getting disconnected. So, the best diagnostics in such situation is to reset it once and then set it up again. Before resetting the extender make sure it is plugged in to the wall and the power led should be stable.

  • Now, different macard extender have different ways to reset it. If your macard extender has reset hole then you need to put a paper clip inside the reset hole of the extender for around 15 seconds while the extender is still plugged in to the wall. After 15 seconds take the pin out and wait for another 60 seconds and let the extender reboot. On successful reset you will be able to see macard extender default name in your wifi list. It will come up as “Wifi-Extender”. You can then start it new setup again.

reset macard wifi extender

  • In case, you have wps/reset button or only wps button on the macard extender then you will need to press and hold that button for around 15 seconds. After 15 seconds release the button. Next, let the extender rest for 60 seconds and then you can try its setup again.

reset macard extender

So, this is how you can reset your macard wifi extender. So, even when you try the setup via “my macard online” or “go macard online” and it doesnt work then resetting the extender once is best practice.

Krevi wifi extender setup

How to Setup Krevi Wifi Extender 5G 1200mbps Dual Band Signal Booster

If you have just bought krevi wifi range extender and you are having hard time setting it up then need not to worry. In this article today we will give you step by step guide on how to setup krevi 5g wifi booster in just few minutes. Before we start the process make sure you have working internet on your router plus your router should be broadcasting the wifi.

Also plug the krevi extender in the same room as your router. Now, once you have solid power led on the extender than we can start the setup process. So we can set it up via two methods, first is wps and second is via browser. Moreover, range extender, wifi booster and wifi repeater are all the same thing. So, if in this article if we use any of the three names then don’t get confused, it means the same thing.

So first and foremost lets learn the easier method that is wps setup

Krevi Extender Setup Via WPS

  • Locate the wps button on your router. You will need to press and hold it for around 2 seconds. Now, you will get a blinking light on the router.
  • ​Within 2 minutes press the wps button on your krevi extender. As you do it you will see a blinking light on the extender.
  • ​Your router and extender will blink for around 2 mins or less than that. After successful wps setup your wifi light on the krevi wifi booster will turn solid.

Krevi Extender Setup WPS

  • ​Moreover, if it doesn’t then the wifi light on the krevi will not turn solid.
  • With Successful setup you will get your extender network showing up in your wifi list. It will come up with “Pro” suffix along with your wifi network name. For example if your router’s wifi name is “mikefamily” then extender network will come up as “mikefamily-pro-2.4g”.
  • ​So, you can now grab your phone or computer and go to its settings or wifi list and there connect to the network ending with “pro” suffix. You will need to type the same password as your router to connect to it.
  • ​Also, you can now unplug the extender and place it at newer location where you need wifi connectivity. It is recommended to place the wifi booster halfway between your router and the location with poor wifi connectivity.

Now lets learn the second method to setup krevi wifi booster. You can try this method if the above mentioned wps setup doesn’t work for you.

Configure Krevi wifi booster via browser

  • First and foremost make sure both your router and extender are plugged in the same room.
  • Also the power LED on the wifi booster should be stable, wait until you have solid green power led on it.
  • Now, you can use your computer or cell phone to setup the extender. So, goto its settings and then to wifi, there you will see “Wifi-Repeater-2.4-XXX” network name. This is your extender. Connect to it.
  • As soon as you do that the krevi extender login window will pop-up automatically. In case it doesn’t than need not to worry. Open a browser on the very same device and in the url or address bar type “192.168.188.1” and hit enter. This will take you to the setup page.
  • Next you will need to select mode if asked. So, there you simply just need to select ‘repeater mode’ among the other options.
  • Later on it will show you the list of all the available networks in your area. You just simply need to select your router’s wifi name among the list and type its password for the confirmation.
  • Choose ‘save settings’ next. As you do that your wifi repeater will take about 60 seconds to configure with your router. Also, your repeater network name will come up in your wifi list as your homenetworkname and then with “Pro” suffix in the end.
  • You can later connect your phones, computers, smart tv’s, security camera’s to this extenders network name.
  • Moreover, you can now unplug the extender and plug it at your desired location. We recommend you to place the extender in around 30-40 feet of radius from the router. It gives best signals when in direct line of sight of the router.

When and How To Reset Krevi Wifi Extender?

It is really important to understand how and when to reset and wifi extender. Because whenever you change your wiif name, or you change your wifi router, or even if you change password on your router then you will have to reset the extender too. Most of the people face this issue. So, in this article today we will tell you how to reset krevi wifi extender in just 10 seconds.

  • First and foremost plug your krevi extender into a wall outlet and wait for atleast 60 seconds until its power led turns stable or solid.
  • Next, find a “reset button” or “wps/reset” button or “wps” button on your extender. You will need to press and hold that button for around 10 seconds while the extender is still plugged in to the wall.
  • You can release the button after 10 seconds and then wait for around 60 seconds.
  • After 60 seconds you will see a extender’s network name showing up in your wifi list. It will come up as “WifiRepeater-2.4G” or “Wifi-XXX”. You can connect to this wifi name and set it up again.

How to connect phone, smart tv, gaming console to the Krevi wiif booster?

You can connect your any smart device to the extender’s network name. First of all make sure your extender is all setup. We have already mentioned the steps above on how to setup krevi. Afterwards it will show up in your wifi list as your home network name and then with “Pro” suffix.

So, lets suppose of you need to connect your smart tv to the krevi extender, then goto the settings and then to networks on your smart tv and then scan for available networks. Next, select your extenders network name and type its password for the confirmation. By default extender uses the same password as your wifi router’s password.

In the same way you can connect phone too. Goto the settings and then to wifi list on your phone. Next, search for wifi network and then select your extender’s network name among the list. Type its password and voila! You are now using extender’s wifi.

So, this is how you can use krevi extender wifi with your different gadgets.

Pix-Link WiFi Repeater Setup

The pix-link wifi repeater is an incredible extender. Its main work is to boost your wifi signal range up to multiple devices. You can access up to 300Mbps Speed on your devices. It supports only a single bandwidth connection, only 2.4Ghz.

The PIX-LINK WiFi Range Extender is also known as the best Pix link wifi Repeater, superior Pix-link Access Point, great signal Pix-link Wireless Signal Booster, etc. It covers or expands the wifi signal range up to the 800 Square feet maximum location.

Moreover, the pix link wifi extender is compatible with any wi-fi router, modem, gateway, or access point. The Pix-link wifi extender signal booster provides 360° strong penetration. It can easily penetrate your home wifi signal in all directions including the dead zone. So, you can use its better wifi connection at any time, appropriate for families, mainly for bedrooms, floors, restaurants, laptops, Smartphones, gardens, telephones, Smart TV, etc.

The pix link wifi extender setup is based on the web, it does not require an app. Just connect the pix-link repeater to the wifi router via the web page. In case you have a WPS-compatible wireless router, you can efficiently boost the wireless range by pushing the WPS button. The pix-link wifi repeater/router/ap overall performance is too good.

pix-link wifi repeater installation

Before connecting the pix-link wifi extender signal booster network kindly install it. You will follow the pix-link wifi repeater instructions and steps given below to installing it.

  • In the beginning, you will take it out from its packaging box.
  • Also, takes all the supplements to the Pix link repeater setup from its packaging box.
  • Kindly take from its supplement a pix-link extender manual.
  • Read all the instructions for the pix-link wifi repeater setup from its user manual guide.
  • Afterwards, place it near your wifi router.
  • Plug it into the power adapter directly and then connect your pix-link wifi repeater with the wifi router.
  • It helps you to boost the network signal range into your home each corner including the dead zone.
  • Just you will place it near the better signal coverage location, otherwise it causes an error.

How to connect pix-link wifi repeater?

After completing the pix-link wifi extender wireless booster installation, you will connect the pix-link wifi extender with the wifi router. These are the steps to connect the pix-link wifi repeater.

  • Repeater mode: Hook up your wireless devices to the Pix-link wifi repeater through an Ethernet cable and wirelessly, then enjoy the internet connection.
  • Plug the Pix-link Wi-Fi Repeater into a main power outlet just next to your wireless router.
  • Make sure the Pix-link wifi extender LED signal light is turned on that shows normal power supply.
  • Now, you have to use a wired/wireless mode to connect it with the internet of your wifi router.
  • If you use a WPS connection mode, then simply hold and press the Pix-link wifi extender WPS button more than 5s until the pix link repeater led blink rapidly.
  • Otherwise, you can use the LAN/WAN connection mode to connect Pc or router with your pix-link extender.
  • After connecting the pix-link wifi extender with the internet the pix-link wifi repeater wifi LED signal light will automatically up and it’s been ready for transmitting the data.

Troubleshooting:– If the Pix-link wi-fi extender LED blinking slow, that means it shows about the Pix-link extender WPS failure or relay failure. Then, it will not transmit or receive data. To get rid of the issue, you just connect it again with the internet and use its network again. Finally, the tp-link system is operating normally.

Pix-link WiFi Extender Login

If you want to make any changes in your device first you will have to access the pix link login page. If you want to know. “How to login the pix-link extender?” Here are the steps which will help you to access the Pix-link wifi extender signal booster.

  • First, connect the pix-link extender wifi to your computer or smartphone.
  • To connect a wifi, go into your phone’s settings, and choose the network or wifi settings.
  • Then, locate under the wifi settings the Pix-link extender SSID: Pix-link-2.4Ghz and enter the pix-link wifi extender default password. Click on the connect option and ensure that your mobile is connected with wifi. If the pix-link wifi extender not connecting, you just try to connect it again with a correct password. If this issue persists, you just simply reset your all devices. Also, unplug the Ethernet cable.
  • Launch the web browser and enter the web address, setup.pix-link or pix-link extender default ip, it is 192.168.7.234.
  • Search the Pix link extender web address and access the web default pix-link repeater.
  • The Pix-link extender login admin page is launched on screen.
  • Type the pix-link wifi extender password and username.
  • Make sure the pix-link extender login credentials are correct. Now, the pix-link wifi extender login process is finished. After login, go to the setup page.

pix link wifi extender setup

After completing the pix link wifi range extender login, you need to modify some settings into your range extender. Here are some following checkpoints for its setup.

  • Once you login it, go on the pix-link wifi repeater setup page.
  • Explore setup.pix-link io the web browser.
  • It will directly move you on the pix link setup page.
  • After this, set the various settings of the pix link wireless range extender.
  • Then, choose the pix-link setup option.
  • After this, to manage and control the settings you will have to emulate the on-screen instructions which are mentioned on the desktop web screen.
  • If you want to do the pix-link-2.4g setup, just choose the network bandwidth settings and let’s apply the network settings for getting the 2.4ghz band network.
  • It gives a better network after modifying the settings like resetting the pix-link extender password because the pix link wifi extender password is the same as your master router.
  • Moreover, you can also make some other changes through the Pix link wifi extender setup page as following the given instructions on the screen.
  • Save all the settings in the end, which you all have modified into your device. Finally, in this way, your pix-link wifi extender configuration has been completed successfully.

reset pix-link wifi extender

There are the following steps to reset pix-link wifi extender factory default settings.

  • The pix-link wifi range extender reset process can be easily done with its reset button,
  • It is given on the pix link extender back panel.
  • You will locate the Pix-link extender reset button.
  • After locating it, press and hold the pix-link extender button more than 5s until the pix-link wifi repeater led quick blinking, through this the pix-link system set factory default settings.
  • Now, you have to reset the pix-link wifi extender.
  • After this, turn on it and use its network for accessing the better connection of the network. Make sure the pix-link extender LED signal light will turn on.

pix-link wifi extender not working

When the pix-link wifi extender not working, you just restart the pix-link wifi extender. After this, go on the web page and configure the pix-link extender wifi settings accordingly. It will provide you with a great network signal as compared to others.

What to do if not connect?

If the Pix-link wifi range extender does not connect with your router, you just ensure that it is compatible with your wireless router or not. If it is not compatible, then use another device and connect it again.

Usually, sometimes, the Pix-link extender does not connect due to an unstable network connection of your wifi router, so, you must verify the signal status of your device and if it does not provide a stable network signal range, you just found out a feasible solution for it.

In this case, you will restart your device and reconfigure it. Surely, through this way you can overcome or easily troubleshoot the Pix-link wifi extender not connecting issue.

pix-link wifi extender review

The Pix-link wifi extender works as a smart system because it boosts your wifi home router signal range in the overall zone into your home and office. It brings the various amazing and superior features that makes its working great. So, if you want to get a better experience device to boost your network, you can use it. The pix link app is too helpful to control and manage its settings anywhere. Whether it’s all setup can be only based on the web browser, but if you want to control its network from outside from the home then you should use the pix link app. The pix-link wifi extender review is great, you can check it from Amazon and another device selling this platform.

Also Read:
wireless-n wifi repeater login

sparklight internet keep disconnecting

Why does my sparklight internet keep disconnecting?

sparklight internet keeps dropping? If yes, don’t fret, it is just caused due to specific reasons like your device is not set up adequately. There are various reasons behind it. Let’s get the solution to resolve it here.

Sparklight (one time named Cable One) is the best service provider that provides cable TV, mobile phone services, and cable internet to approximately 20 states across the US.

It’s concentrated on delivering high broadband network services to companies and residential clients.

While their better network coverage zone has been boosting rapidly, the most extensive coverage locations are Texas, Mississippi, Oklahoma, Arizona, and Idaho.

Even though Sparklight’s internet assistance is restricted to exclusively a few states, it still persists to provide high-speed internet at competitive network device signal speeds. The internet of this device is compatible with various devices. You can set up the Synology storage device by using its network connection. The synology quickconnect password is also set just over the internet, you can use its network to change the synology quickconnect password.

With no agreements and download rates of up to 1Gbps, Sparklight seems to be a tremendous network service provider.

Nevertheless, clients are not optimistic about the restrictive data caps and high costs for their internet speeds.

Read on for elaborate insights into this Sparklight internet-given information.

Sparklight Internet Pros and Cons

These are the following pros and cons of the sparklight internet device are given below.

  • Competitive price for the 100 Mbps plan.
  • Download speeds of up to 1,000 Mbps
  • No contracts
  • An unlimited data add-on is available.

Cons

  • Higher price for gig speeds compared to competitors
  • Low internet data caps
  • A data-cap policy that expresses your internet connection package will be spontaneously upgraded in case you go over it numerous times.

Why does my sparklight internet keep disconnecting?

An internet connection that willy-nilly drops out of assistance at any time isn’t simply a petty inconvenience—it can be a significant hindrance to day-to-day life. In this latest generation of working from home, a trustworthy internet connection is precisely as significant as keeping the lights on.

Unfortunately, the sparklight internet keeps disconnecting connection problems that can result from erratic network speeds or an out-of-date wireless router. Your network connection suffering may even occur from a much more prominent issue occurring on your service provider’s end.

To assist you to decrypt these problems, we concurrently put a checklist of symptoms, diagnoses, and resolutions. Let’s obtain that snappy service back to life. The ap.setup, find.synology, routerlogin.net, findsynology.com, etc. all are web addresses. These all are not accessible without internet and slow internet connection.

The internet speed is too lifeless

Your general networking device speed can decrease in case you have too multiple devices utilizing overly much bandwidth simultaneously. This difficulty is extremely probable when you live with numerous people. Wireless devices can constantly disconnect from Wi-Fi network connections.

For instance, Zoom meetings on a 15–25 Mbps wireless connection may bring choppily or keep disconnecting completely as others stream high-definition web series, and movies and play games online utilizing the same network connection.

Your wireless modem isn’t connecting with your internet provider

Your internet connection may unsystematically disconnect since you have a wireless modem that doesn’t share with your internet connection provider appropriately.

You require a wireless modem for home internet, as it decrypts your internet provider’s signals into data your home network can utilize. Once in a while, problems occur that are out of your management—like difficulties in the vicinity—that generate your wireless modem to disconnect. Other problems may reside on your end that you can troubleshoot.

The Wi-Fi router firmware is out of date

An old wireless router is an ordinary culprit for connection problems. In case you simply purchased the new iPhone 13—which sustains Wi-Fi 6—it won’t see instantaneous Wi-Fi 6 speeds in case you hook up the phone to a more lagging Wi-Fi 4 router. Consistently a wireless router that’s exclusively a couple of years old may be behind the turn or simply worn out.

Wi-Fi 6—likewise known as 802.11ax or Wireless AX—is the most delinquent of six internet protocols supported by the Institute of Electrical and Electronics Engineers (IEEE) over the years.

Including a wireless router that utilizes Wi-Fi 5 or Wi-Fi 6 protocols make sure you’ll obtain optimum network speeds and more OK performance when numerous people are on your Wi-Fi network connection.

Why do we need the Arlo pro1 T705 thermostat installation manual?

The Arlo Pro1 T705 specializes in the configuration and manufacturing of experienced quality products that enhance the convenience of the home and facilitate installation. All the thermostat products are created to accommodate the interpretation and dependability needs of experienced heating and cooling technicians.

Heating and cooling account for nearly half of our annual home energy consumption. You can privately decrease almost 2,000 pounds of carbon emissions yearly with a few easy adjustments. The American Council for an Energy Easy economy has more information for keeping power on heating and cooling.

It also requires an internet connection for using it. The tplinkrepeater is the best wireless device that gives a better connection to the network.

Instinctive path, leave, return, sleep programming icons. Different heating and cooling swing (rotation speed) adjustments.

Apart from this, it comes with various features and is designed with new technology. So, you can use it with any access point, wifi repeater, wifi router, any gateway, etc.

Arlo pro1 T705 thermostat

The Arlo pro1 T705 thermostat is an incredible wireless thermostat, it is made up of the latest generation features. This thermostat is created for the highest dependability and comfort of use ideals. It is easy to use, easy to install and provides a great value for money.

Apart from this, the Arlo PRO1 T705 is a Single Stage NEW AL AC Air Conditioner Programmable Digital Thermostat. The performance of the Arlo pro1 T705 thermostat is too effortless as compared to others. These are the following information about the Arlo pro1 T705 thermostat. It is such as;

  • Brand: PRO1 IAQ
  • Color: Beige
  • Item Dimensions LxWxH: 4.7 x 1.1 x 4.4 inches
  • Style: Modern
  • Power Source: Battery Powered
  • Controller Type: Manual Control

Moreover, the features of the Arlo pro1 T705 thermostat are such as Single stage, 1 heat 1 cool, 5/1/1 programmable, Battery powered or hardwired, 4 sq. inch display with blue backlighting, etc. All these are the following features of the Arlo pro1 T705 thermostat.

If your thermostat does not connect to the internet, you just use the wireless repeater. The tp link re450 setup is too easy compared to others.

Arlo pro1 t705 thermostat technical specs

These are the following specifications of the Arlo pro1 t705 thermostat. All are described below.

  • Brand: PRO1 IAQ
  • Color: ‎Beige
  • Item Dimensions LxWxH: 4.7 x 1.1 x 4.4 inches
  • Style: ‎Modern
  • Power Source: Battery Powered
  • Manufacturer: Alfi
  • Part Number: ‎T705
  • Item Weight: 10.2 ounces
  • Product Dimensions: 4.7 x 1.1 x 4.4 inches
  • Item model number: ‎T705
  • Controller Type: Manual Control
  • Voltage: ‎30 Volts
  • Material: ‎Not Specified
  • Screen Size: 4 Inches
  • Backlight: Yes
  • Shape: Rectangular
  • Batteries: 2 AA batteries are required.
  • Is Discontinued By Manufacturer: No
  • Amperage Capacity: 1 Amp
  • Item Package Quantity: ‎1
  • Display Style: ‎Digital
  • Included Components and package accessories: Thermostat
  • Batteries Included?: ‎No
  • Batteries Required?: ‎No
  • Battery Cell Type: Alkaline
  • Warranty Description: 5-year limited manufacturer’s warranty.

Why do we need the Arlo pro1 t705 thermostat installation manual?

Ordinarily, the Arlo pro1 t705 thermostat installation manual is crucial. It is used for installing the Arlo pro1 t705 thermostat very perfectly. You can not install your wireless Arlo pro1 t705 thermostat without using the installation manual. So, please check all the details of all the Arlo pro1 t705 thermostat installation manual instructions before installing it.

The Arlo pro1 t705 thermostat installation manual usually provides you with all the instructions for using the thermostat very perfectly. It also helps you to connect it with an internet connection.

If you think about “how to do the tp-link re200 setup” with your device then you should connect it with the internet connection. Then, you just follow all the instructions of the Arlo pro1 t705 thermostat installation manual.

Do not install Arlo pro1 t705 thermostat in locations:

The following information is given for the Arlo pro1 t705 thermostat installation.

  • Please do not keep the Arlo pro1 t705 thermostat near hot or cold air chimneys.
  • That is in immediate sunlight and with an exterior wall back the thermostat.
  • You can not use the Arlo pro1 t705 thermostat in areas that do not need conditioning.
  • Apart from this, you can not use the Arlo pro1 t705 thermostat where there are dead spots or drafts or in corners or behind doors.
  • You can not use the Arlo pro1 t705 thermostat where there might be hidden chimneys or pipes.

Furthermore, by using the Arlo pro1 t705 thermostat installation manual guide, you can easily know about the installation tips. Such as mount thermostat, battery installation, getting to know your thermostat, removing the private label badge, etc.

Also Read:
192.168.10.1
Wavlink Av500 Powerline Setup
Wavlink AC600 Outdoor Installation

How to use google home mini without internet?

The soundest Google Home speakers can cater to your exhaustive needs. Google and different smart home manufacturers provide an enormous choice of audio devices for all kinds of other scenarios, whereas it doesn’t imply everyone is worth purchasing.

Every kind of wireless Google home is powered by Google Assistant, a virtual butler that arrives pre-installed in the Google Nest Hub (2nd Gen) and Google Nest Mini display, as well as the smart $99 Google Nest Audio.

Through google home you can almost control your all devices. Just you need to connect it with the internet connection. There plenty of wireless routers are designed with the Google home and various device compatibility features. You can use the router wifi with the wasserstein floodlight camera too. If the wasserstein floodlight not working you just reset your wireless networking device.

With one of these best Google-brand devices, you can get the benefit of the best Google Assistant commands. Whereas there are exceptional third-party speakers that sustain wireless Google Assistant, excessively.

If you would like to know, “how to use Google Assistant without wifi?” Just follow the instructions given here and various easy steps for using it without the wifi.

2022 best Google Home speakers

The 2022 ultimate Google Home speakers have come with various pros and cons. You’ll like to review all the best Google homes before making a buying decision. Despite this, all the best wireless devices are getting the best position after various hours of testing. The 2022 top choice of the customer is the new Google Nest Audio, which Google just released as a sequel to the Wireless Google Home.

Compared to the initial Wireless Google Home, the $99 Nest Audio includes more robust performance, more rapid Assistant reactions, and a more soothing exterior. It’s a lavish-sounding—although not too costly—option. You can use it to control the Philips Avent baby monitor camera. If the philips avent baby monitor not working you just connect it again with the network and reset your all wireless devices.

Set as an Echo Dot opponent, the consistently more cheap $49 Google Nest Mini is a compact speaker that allows you to take advantage of Google Assistant’s superpowers. Its trendy, fabric-swathed structure conceals the particular fact that it’s even an electronic device. Plus the Nest Mini’s built-in wall-mount signifies you can free up amazing counter space.

Such as all the ultimate smart speakers, will hear your voice and execute a vast number of tasks, like streaming music from Spotify, Pandora, and others; supporting smart home devices such as wireless cameras, AC, thermostats, and lights; functioning as a home communication hub; peeking up the weather; ordering you food. You can consistently use Google Assistant to handle your smart TV, or function as an interpreter between two additional languages.

The 2022 best smart home speakers are Google Nest Audio, Google Nest Mini, Sonos one, Google Nest Hub Max, Sonos move, Google Nest Hub (2nd Gen), Lenovo Smart Clock, etc.

Can I use a google home mini as a Bluetooth speaker?

Yes, you can use the google home mini as a Bluetooth speaker. You just start working and then enable the Bluetooth on your phone to use a google home mini as a Bluetooth speaker.

How to use google home mini without internet?

If you would like to use the Google home mini without the internet connection, just turn on the Bluetooth connection on your phone. Also, enable the Google home Bluetooth mode by using the app. It allows you to use Google home without an internet connection. These are the following steps to use google home mini without the internet.

  • If you want to use google home mini without internet, just turn on its power.
  • After this, let’s pair your mobile phone with it via Bluetooth mode.
  • Turn on the Bluetooth mode on your smartphone.
  • Follow the on-screen instructions and pair the Google home with it.
  • Click on the pair option after enabling the Bluetooth option.
  • Choose the device name which you would like to pair.
  • It allows you to pair it with your mobile phone.
  • Wait for a second until it’s not paired.
  • In the end, let’s use google home mini without internet.

can google nest mini be used without wi-fi?

Yes, the google nest mini is used without a wi-fi connection. It is designed with a wifi connection and Bluetooth compatibility. You can use it to control your various devices. The laview camera is also compatible with it. Make sure both devices are connected with the internet connection, otherwise, it causes the laview camera not connecting issue. So, connect it with a good network connection and use it for controlling all your devices.

How do I turn my google home mini into a Bluetooth speaker?

You can use the Google home mini app to turn the google home mini into a Bluetooth speaker. It instantly allows you to use it or play google home and Bluetooth speakers at the same time.

Also Read:
ap.setup
WAVLINK AC1200 Router Firmware